Sunday 28 June 2020

Get SQL Server Database Users

The following command will provide a list of all database users Including SQL Users and Windows Users:

Use DATABASE_NAME
SELECT
FROM sys.database_principals
WHERE default_schema_name = 'dbo'

If your requirements are to only fetch SQL Users or Windows Users, use:

SQL Users only:

SELECT 
FROM  sys.database_principals
WHERE  type_desc = 'SQL_USER' AND 
default_schema_name = 'dbo'

Windows Users only:

SELECT 
FROM  sys.database_principals
WHERE  type_desc = 'WINDOWS_USER' AND 
default_schema_name = 'dbo'

Friday 31 August 2018

ASP.NET MVC: Html.Partial vs Html.RenderPartial & Html.Action vs Html.RenderAction

These are the common yet confusing Html helpers provided by ASP.NET MVC Razor Views.

Html.Partial() and Html.Action() returns MvcHtmlString. This means, it writes your output in parent view first and then return complete result to client's browser.
  • These methods are less resource intensive.
  • Slower than 'render' methods.
  • Should be preferred if your website has heavy traffic.

Html.RenderPartial() and Html.RenderAction() have void return type. This means, they write nothing on its parent view. So how do we still see the output? The answer is- these methods write output directly to the response.
  • Consume resources more.
  • It is faster method because it is rendered separately.
  • Should be preferred if your website has inadequate traffic.

Html.Partial() and Html.RenderPartial() can be used without an action method. If your parent view already has a model, you can pass that model to sub view you are trying to render.


Html.Action() and Html.RenderAction() can only be used with an action or child action. Use it when child view will have independent model.

More comments are welcome! :) 

Decrease size of Excel 2016 Workbook

Some of our clients use Excel Workbook to collaborate in SharePoint 2016 on-prem. One workbook had 9 sheets in it and the total size was 6 MB.

Later, a team member copied a sheet into it from another workbook and suddenly file size increased to 80MB. After that, it started opening super slow for all users and we started receiving complaints about it.

After looking at the document that why the size has increased that much we found-

  • Use of different colors all over new sheet.
  • Some cells have some comments in them.
  • Data was not a lot. (Confusing!!)
  • There is no formula used in sheet. (which is not the cause of increased size.)

Solution:

I saved the workbook in Excel Binary Workbook .xlsb from .xlsx.
File size reduced to 10 MB.

Thursday 23 June 2016

Hide Submit button after the InfoPath Form is submitted - SharePoint 2013

This seems simple but, to me, it took a while to figure out how to achieve this. So I thought I should write a post for other guys out there trying to get same results.

No more talking. Let's get started!!

NOTE: I assume that you have InfoPath Form published on a SharePoint site with Submit functionality enabled.

Our Scope is: We want to show the Submit button only for the very first time when the form is being filled by user. Once user submit the form, the Submit button will not be shown ever if the form is opened again.

Below are the steps to achieve this:
  1. Every InfoPath Form with submit functionality enabled has Submit, Save, Save As and etc. buttons by default in the Ribbon.
  2. To achieve what we want, we need to get rid of Submit Button from the Ribbon. To do so, open your form in InfoPath Designer and do as follows-
    • Goto File > Advanced form options > Web Browser > Uncheck Submit
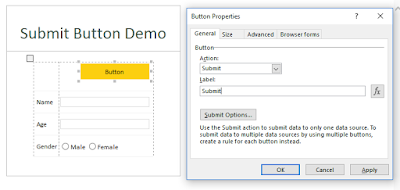
    • Add a Button Control at the top of your page. Right click on it and set the values as shown below:
      Hit OK.
    • Add a New Field from fields toolbox.To do so, right click on myfields node > Add > use setting as shown below:
    • Add Formatting Rule to your button. Use below Condition:
      Hit OK. Check the checkbox "Hide this control"
    • Publish (not Quick Publish) your form again. Add New Field as column when it asks. Make sure you check "Allow user to edit data in this field by using a datasheet or property page."
    • Add a Workflow that starts whenever an Item is Created. Use the following statements:
      Publish Worklfow.
  3. You are all set! Try to submit your form and open it again. Submit button is gone.
Views? Questions? Feel free to let me know in the Comments section below.

Wednesday 3 June 2015

Creating New Master Pages for SharePoint Site - SharePoint 2013

If you are having an requirement to create different layout for different set of pages in a SharePoint site then you are reading right post.
To use different layout for SharePoint site you can use SharePoint Designer 2013.

Steps to achieve this-
1. Once you login to the site from SharePoint Designer 2013, click on 'Master Pages' from Navigation area on the left side.

2. From the Ribbon click on 'Blank Master Page' and give it a name.

3. You'll have a page with basic HTML structure which you can change the way you want. Make desired changes to meet your requirements.

Now you have Master Page ready. To create content page follow these steps-
1. Go back to 'Master Pages' section. Right click on the Master Page you just created and select 'New From Master Page'

3. Enter Name for your content page and click OK.

2. Add the controls to the content page that points to the controls in the master page you just created.


Hope this would help you. If you have any question, do not hesitate to leave comment.

Friday 19 September 2014

Privacy Policy of Tapusi

Privacy Policy of Tapusi

iknowledgeboy operates the iknowledgeboy.blogspot.com website, which provides the SERVICE.

This page is used to inform website visitors regarding our policies with the collection, use, and disclosure of Personal Information if anyone decided to use our Service, the iknowledgeboy website.

If you choose to use our Service, then you agree to the collection and use of information in relation with this policy. The Personal Information that we collect are used for providing and improving the Service. We will not use or share your information with anyone except as described in this Privacy Policy.

The terms used in this Privacy Policy have the same meanings as in our Terms and Conditions, which is accessible at iknowledgeboy.blogspot.com, unless otherwise defined in this Privacy Policy.

Information Collection and Use

For a better experience while using our Service, we may require you to provide us with certain personally identifiable information, including but not limited to your name, phone number, and postal address. The information that we collect will be used to contact or identify you.

Log Data

We want to inform you that whenever you visit our Service, we collect information that your browser sends to us that is called Log Data. This Log Data may include information such as your computer’s Internet Protocol ("IP") address, browser version, pages of our Service that you visit, the time and date of your visit, the time spent on those pages, and other statistics.

Cookies

Cookies are files with small amount of data that is commonly used an anonymous unique identifier. These are sent to your browser from the website that you visit and are stored on your computer’s hard drive.

Our website uses these "cookies" to collection information and to improve our Service. You have the option to either accept or refuse these cookies, and know when a cookie is being sent to your computer. If you choose to refuse our cookies, you may not be able to use some portions of our Service.

Service Providers

We may employ third-party companies and individuals due to the following reasons:

  • To facilitate our Service;
  • To provide the Service on our behalf;
  • To perform Service-related services; or
  • To assist us in analyzing how our Service is used.

We want to inform our Service users that these third parties have access to your Personal Information. The reason is to perform the tasks assigned to them on our behalf. However, they are obligated not to disclose or use the information for any other purpose.

Security

We value your trust in providing us your Personal Information, thus we are striving to use commercially acceptable means of protecting it. But remember that no method of transmission over the internet, or method of electronic storage is 100% secure and reliable, and we cannot guarantee its absolute security.

Links to Other Sites

Our Service may contain links to other sites. If you click on a third-party link, you will be directed to that site. Note that these external sites are not operated by us. Therefore, we strongly advise you to review the Privacy Policy of these websites. We have no control over, and assume no responsibility for the content, privacy policies, or practices of any third-party sites or services.

Children’s Privacy

Our Services do not address anyone under the age of 13. We do not knowingly collect personal identifiable information from children under 13. In the case we discover that a child under 13 has provided us with personal information, we immediately delete this from our servers. If you are a parent or guardian and you are aware that your child has provided us with personal information, please contact us so that we will be able to do necessary actions.

Changes to This Privacy Policy

We may update our Privacy Policy from time to time. Thus, we advise you to review this page periodically for any changes. We will notify you of any changes by posting the new Privacy Policy on this page. These changes are effective immediately, after they are posted on this page. This Privacy Policy was created with the GDPR Privacy Policy Generator.

Contact Us

If you have any questions or suggestions about our Privacy Policy, do not hesitate to contact us.

Friday 2 May 2014

CSS Designs - Buttons to wow your user's experience

Here are some very simple and good looking button designs that you can use to match with the layout of your website.

Flat Button

HTML-
<input type="button" id="flat" value="Flat Button" />

CSS-
#flat{
padding: 10px 60px;
border: none;
background-color: #00A0B1;
color: #fff;
}

Round Button

HTML-
<input type="button" id="round" value="Round Button" />

CSS-
#round{
padding:10px 60px;
border:none;
background-color: #643EBF;
color: #fff;
border-radius: 8px;
}

Ellipses Button

HTML-
<input type="button" id="ellipses" value="Ellipses Button" />

CSS-
#ellipses{
padding: 20px 60px;
border: none;
background-color: #2E8DEF;
color: #fff;
border-radius:50%;
}

Circle Button

HTML-
<input type="button" id="circle" value="Circle Button" />

CSS-
#circle{
width:100px;
height:100px;
border:none;
background-color: #A700AE;
color: #fff;
border-radius:50%;
}

Shadow Button

HTML-
<input type="button" id="shadow" value="Shadow Button" />

CSS-
#shadow{
padding: 10px 60px;
border:none;
background-color: #BF1E4B;
color: #fff;
box-shadow: 2px 2px 5px black;
}

Text Shadow Button

HTML-
<input type="button" id="textshadow" value="Text Shadow Button" />

CSS-
#textshadow{
padding: 10px 60px;
border:none;
background-color: #DC572E;
color: #fff;
text-shadow: 2px 2px 2px black;
}

Embedded Text Button

HTML-
<input type="button" id="embedded" value="Embedded Text Button" />

CSS-
#embedded{
padding: 10px 50px;
border: none;
background-color: rgba(0,0,0,0.3);
color: rgba(0,0,0,0.7);
font-weight: bold;
text-shadow: 0 1px 1px whitesmoke;
}

Combining All

HTML-
<input type="button" id="btn" value="Button" />

CSS-
#btn{
padding: 10px 60px;
border: none;
background-color: #0A5BC4;
color: #fff;
letter-spacing:1px;
text-shadow: 1px 1px 2px black;
box-shadow: 0 0 3px black;
}